Erlang and Elixir with asdf in Raspberry 4 with Ubuntu 20.04

To install the latest/current versions of erlang (23.0.2) and elixir (1.10.3), follow the instructions below:

Install asdf ( full instructions https://asdf-vm.com/#/core-manage-asdf-vm):

git clone https://github.com/asdf-vm/asdf.git ~/.asdf --branch v0.7.8

Add the following two lines in your ~/.bashrc file:

# Add asdf version manager 
. $HOME/.asdf/asdf.sh
. $HOME/.asdf/completions/asdf.bash

Reload/Source your bash file with

source ~/.bashrc

Install the erlang plugin

asdf plugin add erlang

If you get the following warnings:

...
Extracting source code
Building Erlang/OTP 23.0.2 (asdf_23.0.2), please wait...
WARNING: It appears that a required development package 'libssl-dev' is not installed.
WARNING: It appears that a required development package 'automake' is not installed.
WARNING: It appears that a required development package 'autoconf' is not installed.
WARNING: It appears that a required development package 'libncurses5-dev' is not installed.
Configure failed.
...

Install the missing packages:

sudo apt install libssl-dev automake autoconf libncurses5-dev

Install latest erlang version:

asdf install erlang latest
...
Erlang/OTP 23.0.2 (asdf_23.0.2) has been successfully built
...

Set it up globally (if you want):

asdf global erlang 23.0.2

Add elixir plugin:

asdf plugin add elixir

Install latest elixir version (1.10.3):

asdf install elixir latest

Set it up globally:

asdf global elixir 1.10.3-otp-23

Finally you can also install the latest Phoenix version (1.5.3):

mix archive.install hex phx_new 1.5.3

WiFi, Raspberry Pi 4 B, Ubuntu 20.04

After installing an image of the Ubuntu server on the Raspberry 4, the wifi is not automatically configured after the initial book.

In order to be able to use the WiFi follow the steps described below for setting up your wifi in your SD card, and then reboot your raspberry (make sure that the indentation in the yaml file is correct, and also your WiFi access point is enclosed in quotes):

https://ubuntu.com/tutorials/how-to-install-ubuntu-on-your-raspberry-pi#3-wifi-or-ethernet

sudo kubeadmin init returns with: [ERROR Swap]: running with swap on is not supported. Please disable swap

Problem

You are trying to set up kubernetes on your local machine but trying to use initialize it with kubeadmin init, returns the following error:

[init] Using Kubernetes version: v1.18.3
[preflight] Running pre-flight checks
error execution phase preflight: [preflight] Some fatal errors occurred:
        [ERROR Swap]: running with swap on is not supported. Please disable swap
[preflight] If you know what you are doing, you can make a check non-fatal with `--ignore-preflight-errors=...`
To see the stack trace of this error execute with --v=5 or higher

Solution

Switch the swap to off (Ubuntu command below) and try again.

sudo swapoff -a

Setting up worldPing with Grafana running in docker

You would like to test worldPing (https://worldping.raintank.io/worldping/) in your local environment for evaluation purposes.

  • Install Grafana with docker as described here (https://grafana.com/docs/grafana/latest/installation/docker/) and give it a name (ie grafana)
  • Login to the grafana container and install the worldPing plugin:
$ docker exec -it grafana /bin/bash
bash-5.0$ grafana-cli plugins install raintank-worldping-app
  • Exit from the container and stop and start it
bash-5.0$ exit
$ docker stop grafana
$ docker start grafana
  • Login to your grafana installation on the browser (localhost:3000) and go to the section for the plugins to find worldPing
  • To be able to enable it you will need an API key from Grafana Cloud, so create a free account (https://grafana.com/signup/starter/connect-account)
  • Create an API key (Security – API Keys – Add API Key)
  • Go back to Grafana web UI and add the API key so you can enable the worldPing. Add an endpoint to check and select the services to check (DNS, Ping, HTTP, HTTPS)
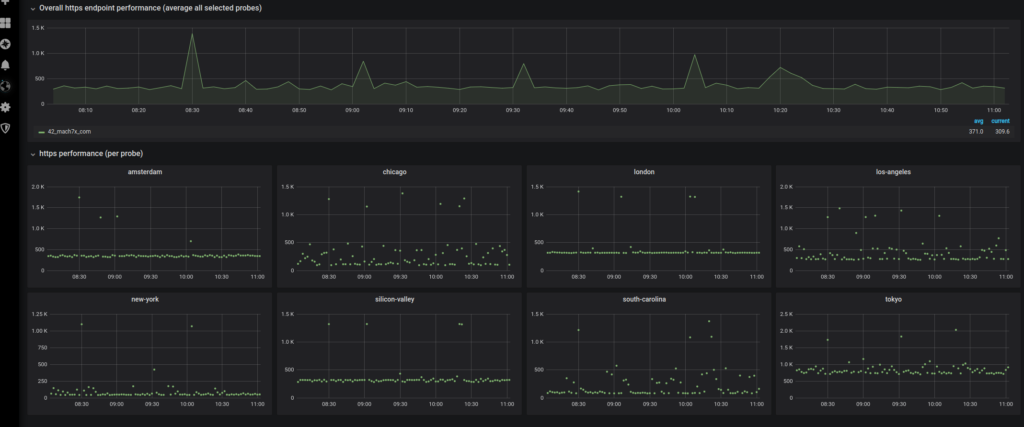
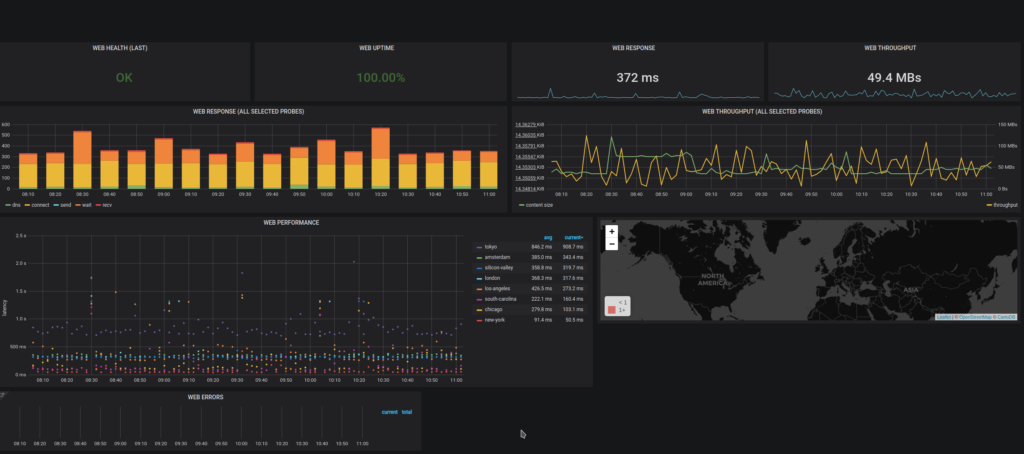
  • Leave it running for a few minutes and check the dashboards afterwards.
  • Remember to Disable if you want to go back to it again in the near future, or Destroy the endpoint if you do not need it anymore.

ssh-add, Gitlab CI/CD with alpine image

Problem

Trying to use the usual way of adding Gitlab’s key to the ssh agent, is not working in alpine image (but it works in debian/ubuntu), and you get the following error message:

 - ssh-add <(echo "$GITLABCICD_PRIVATE_KEY")
/bin/sh: syntax error: unexpected "("

Solution

Try to use the following instead:

  - echo "$GITLABCICD_PRIVATE_KEY" | ssh-add -

AWS allowing access to Billing to IAM user

Problem

When you create a new AWS account the access to Billing for IAM users is not enabled by default.

Solution

In order to allow access you have to follow the steps below:

  • Login to your AWS account with your root user (email and password)
  • Go to the top right drop down ‘My Account’
  • Find the section that is called ‘IAM User and Role Access to Billing information’, use ‘Edit’, tick the box ‘Enable access’ and then ‘Update’.

More information can be found in the Amazon’s help page https://docs.aws.amazon.com/awsaccountbilling/latest/aboutv2/control-access-billing.html#ControllingAccessWebsite-Activate

Get a list of your Route53 subdomains using aws cli docker image

Problem

You would like to have a list of your subdomains for a specific domain (hosted zone), that are hosted in Amazon’s Route 53.

Solution

You can install the aws cli docker image from here https://github.com/cgswong/docker-aws if you don’t want to install the aws cli in your computer.

You can afterwards start the container with:

docker run -it cgswong/aws:latest

Then configure it by running the following and adding your credentials and zone:

efe9881d4fd:/tmp# aws configure
 AWS Access Key ID [None]: aws_access_key_id
 AWS Secret Access Key [None]: aws_secret_access_key
 Default region name [None]: eu-central-1
 Default output format [None]:

Then run the first command to get a list of the hosted zones and get the id of the hosted zone you want to find the subdomains for:

3efe9881d4fd:/tmp# aws route53 list-hosted-zones
{
    "HostedZones": [
        {
            "ResourceRecordSetCount": 2, 
            "CallerReference": "RISWorkflow-RD:xxxxx", 
            "Config": {
                "Comment": "HostedZone created by Route53 Registrar", 
                "PrivateZone": false
            }, 
            "Id": "/hostedzone/HOSTEDZONEID", 
            "Name": "domain.net."
        }, 

Then pick the HOSTEDZONEID and run the following to get a list of subdomains for that domain:

3efe9881d4fd:/tmp# aws route53 list-resource-record-sets --hosted-zone="HOSTEDZONEID" | grep "Name" | uniq

   "Name": "alpah.domain.com.",                                                                                                                                                                                                                                             
   "Name": "beta.domain.com.",                                                                                                                                                                                                                                       
   "Name": "lamda.domain.com.",
......

Terraform Cloud – error when trying to initialize

Problem

You would like to start using Terraform Cloud and when trying to initialize it with the new remote backend (app.terraform.io), you get the following error:

Error: Required token could not be found

Make sure you configured a credentials block for app.terraform.io in your CLI
Config File.

Solution

Follow the instructions here https://www.terraform.io/docs/cloud/free/index.html and create a file ~/.terraformrc (in linux) with an API token.